So you want to Build an Arduino Stopwatch! That’s awesome and a great starting project for anyone!
Table of Contents
- Necessary Items
- Getting Started
- Software and Downloads
- Begin to Code our Arduino
- First Upload
- Full Code
- Troubleshooting
Necessary Items
There are a few things you are going to need to get started!
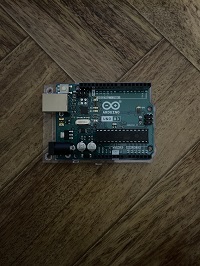
- Arduino UNO Board found on Amazon
- Purchased on Amazon for around $20 on Sale and $30 MSRP
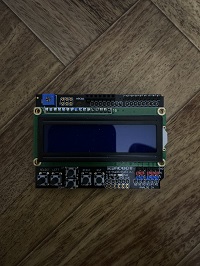
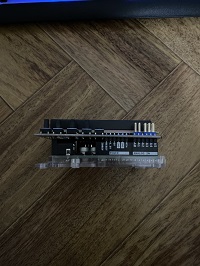
- DFROBOT Gravity: 1602 LCD Keypad Shield found on Amazon
- Used to display stopwatch letters on screen
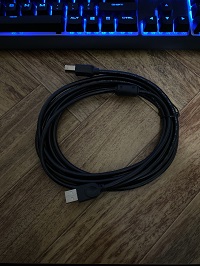
- Standard USB-DataSync Cable for Arduino UNO found on Amazon
You will also need a computer where you can connect your Arduino and get started!
Getting Started!
First, you need to make sure you have all the necessary materials as described above.
Once you have all of these we can begin!
Here is what we have to begin with!
- Now that we have our items, we can take the LCD Keypad and connect it to the pins on the UNO Board. (Make sure to line them up and press down)
-
Connect your Standard USB Cable to the Arduino UNO Board and connect it to your computer.
-
Now we are ready to begin and can go over to our computer!
Software and Downloads
In order to properly program and upload our code to our new Arduino device, we need to use the Arudino IDE
- The current version at time of publication is IDE 1.8.13, however, most information should not see a large update
We now have all the software that we need and can begin working on our Stopwatch!
Understanding Arduino
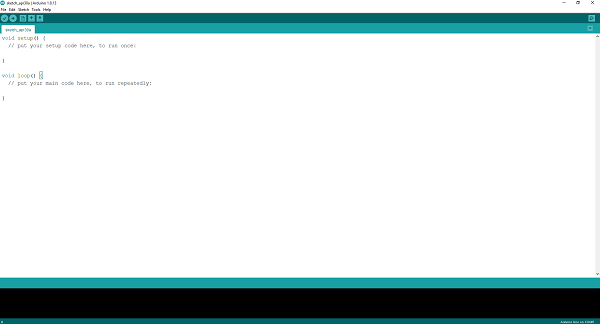
The first thing you are going to notice when you begin the Arduino software is the blank template provided.
This template begins with two void methods, returning no output but instead controlling the actions of our Arduino
There are two methods that are written here:
- setup()
- loop()
void setup() is only ran once when we begin our Arduino and sets up our device for its purpose
- This is important as it allows us to prepare everything for our stopwatch rather than having to worry about small changes in later stages
void loop() - This is what really allows the stopwatch to come alive and our Arduino to work
- For our stopwatch(any digital watch) to function the time must be constantly updated and kept track of. Not only does time need to be synced but also uploaded to the device and to the screen periodically.
- This means, if we had a stopwatch that was updating the screen every millisecond… we would need to update our screen at least every millisecond.
- A small issue with this is that it should be a proper subdivision of one millisecond. Suppose we chose 0.728/1 millisecond to update. Then we would see solid increments in time, however, when the millisecond would change from 1 to 2, our update would be off. This is because, though we are updating quicker than the time period it will not properly display the times as they change.
- The issue described here will not pertain to our project. However, this is something to understand for later interest
Begin to Code your Arduino
Great! Now that you have everything else setup, we can begin to code our Arduino stopwatch!
Let’s take a look back at our code and begin
- The first thing we are going to want to pay attention to is making sure that we include valuable imports for a working LCD screen
- These two lines of code will import important libraries that allow us to communicate with our LCD screen and display our data
#include <SPI.h>
#include <LiquidCrystal.h>

//not used now, at a later time --> used as reference
void setup()
{

}

void loop()
{

}
- Now we are going to do two things before getting into our
setup()method- The first thing is setting up which pins we are using on our LCD shield which correlate physically with how we want to view our displayed information
- Secondly, we are going to create some variables that are used for counting and making a stopwatch. A start, stop and elapsed time.
- These lines of code are going to be in between the
#include <LiquidCrystal.h>andvoid setup()lines - Unsigned long variables are extended size variables for number storage, and store 32 bits (4 bytes). Unlike standard longs unsigned longs won’t store negative numbers, making their range from 0 to 4,294,967,295 (2^32-1)
- Since we cannot count time in a negative range, it makes sense to used unsigned. The long is used because we don’t know how long we are going to be running the stopwatch in the future
//pins used on the LCD Shield
LiquidCrystal lcd(8,13,9,4,5,6,7);

//variables used when handling our stopwatch data
unsigned long start_time;
unsigned long finish_time;
unsigned long time_elapsed;
boolean r = false;

//variables for debounce time
long timeSinceLastPress = 0; //time since last button press
long debounceDelay = 50; //debounce time, which is set as low as possible
- Now we are ready to move into our
void setup()code and we can start with something cool to get setup!- Remember that this code is ran once and should just be used to setup the arduino device
- We are going to do this in two steps, the first step is going to show your true programming power
void setup()
{

    lcd.begin(16,2);
    lcd.print("Hello World!");
    lcd.setCursor(3,1);
    lcd.print("I'm Alive!");

}
Awesome! You’ve now uploaded the first few words to your arduino device! But how do we get this to display?
- Head to
Toolsat the top of your Arduino IDE - Once there, you should see port as one of the options
- Make sure that your Arduino device is connected to a powered USB port in your computer and select this port
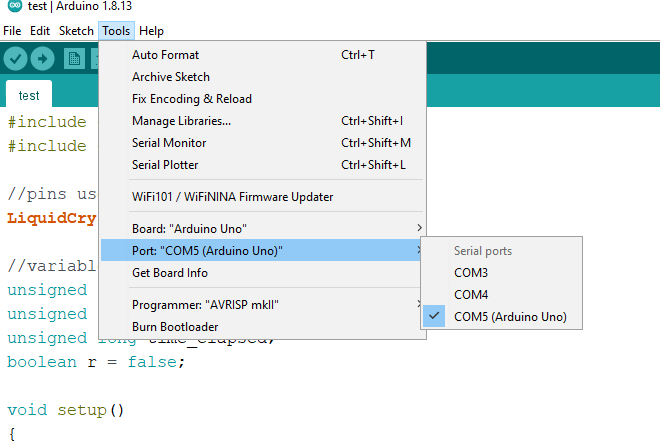
If this does not work reference Part 7 of the tutorial where we work through device manager to get this setup
Now we can actually display some important information for our Arduino stopwatch!
We will be changing what we have typed previously in our void setup() method, but it will have the same general approach
void setup()
{

    lcd.begin(16, 2); //initialize the lcd 16 characters and 2 line
    lcd.print("Mark's"); //your name
    lcd.setCursor(3,1); //set cursor to the fourth char on line 2
    lcd.print("Stopwatch");
    delay(2000); //wait two seconds
    lcd.clear(); //clear the lcd display
    lcd.print("Press SELECT for");
    lcd.setCursor(2,1); //set cursor to the third char on line 2
    lcd.print("Start & Stop");

}
First Upload!
Let’s take what we’ve done and upload it to our device!
We’ve already selected our device in tools, so now we choose to Verify our code and Upload it to our device.
There shouldn’t be any issues with verifying our code, however, if there are just go back through the guide and see if you have any differences. Checking out the full end code may assist in seeing the full picture!
The button to verify is the left check mark and once you’re done with that you can hit the rightarrow and upload it to the device! Once you hit upload take a look at your screen!

Great! Now we can begin working on our loop! But what a good start! Getting ready to continue!
Progress Pictures


Coding the Loop method
Now that we have the beginning of our stopwatch setup, we can begin to code our loop and get it working!
To make the stopwatch work as simple as possible, the loop will be comprised of two other methods, that will repeat one after another.
The two methods work as described below
- Update the Start and Stop time and check for a button press to begin counter
- Display time elapsed on the LCD Shield
Therefore, the first method we are going to create is StartStopUpdate()
We want to start our stopwatch using the SELECT button that is found on the LCD Shield. The SELECT button on our LCD Shield is going to correspond to an A0 value of 800-1000. Therefore, when our arduino reads a value between 800-1000, we want to begin our counter.
void loop()
{

    StartStopUpdate();
    //next method below

}

void StartStopUpdate()
{

    int x; //create new variable
    x = analogRead(); //assign the button press to x. This way we can check the value and know if the counter should begin
    if (x <= 1000 && x >= 800) //the select button
    {

        //begin our code to start our stopwatch

    }

}
The next major thing we are going to need to do is keep track of when the timer begins and when we stop the timer. What helps with this are those variables we created at the beginning! long timeSinceLastPress and debounceDelay
- Debounce - The term debounce comes from electronics. When you’re pressing a button, let’s say on your TV remote, the signal travels to the microchip of the remote so quickly that before you manage to release the button, it bounces, and the microchip registers your “click” multiple times. To mitigate this, once a signal from the button is received, the microchip stops processing signals from the button for a few microseconds while it’s physically impossible for you to press it again.
Source: https://www.freecodecamp.org/news/javascript-debounce-example/
The main addition to this function is our if conditional statement. This statement will keep moving back and forth where on one click we begin the time and show “Time Elapsed”. The other conditional is when we stop the time and will show “Final Time”
void StartStopUpdate()
{

    int x; //create new variable
    x = analogRead(); //assign the button press to x. This way we can check the value and know if the counter should begin
    if (x <= 1000 && x >= 800) //the select button
    {

        if ((millis() - timeSinceLastPress) > debounceDelay) //check to see if the button was pressed a second time considering our debounce delay
        {

            if (r = false) //initial variable to check if we should begin counting
            {

                lcd.clear(); //clear all lcd screen text (blank)
                lcd.setCursor(2,0); //begin at bottom left of screen
                lcd.print("Elapsed Time");
                start_time = millis(); //save our start time for final calculation

            }
            else if (r == true)
            {

                lcd.setCursor(2,0); //same bottom left location
                lcd.print(" Final Time ");

            }
            r = !r //switch r back and forth between false and true. Don't execute the same if statement above twice

        }
        timeSinceLastPress = millis();

    }

}
millis()becomes our time increment for these methods
Great! Now that we are done with this, we can work on displaying our result to the LCD Shield!
Let’s explain our variable r real quick to get a better understanding of its function if you haven’t already noticed. The value of r being a boolean will only be one of two values true/false.
The function of the r value in our loop is to determine whether we are counting with the stopwatch or displaying the elapsed time when we stop the watch.
- In our case, when r = false; we are counting and when r = true; we are showing the final time
Our second method is going to be the DispResult() method which will be added to our void loop() method as well
//adding to our void loop method

void loop()
{

    StartStopUpdate();
    DispResult();

}
Continuing below StartStopUpdate()
void DispResult()
{

    if (r=true) //we are done counting - display final
    {

        finish_time = millis(); //save the stop time to calculate difference between start to know elapsed
        //main equation (end - start) = elapsed -- Ex. (10:15pm - 10:00pm) = 15 minutes elapsed

        //declare final variables for time
        //rather than long names (hour, minutes etc.) just use letter abbreviations
        float h, m, s, ms; //going to millisecond accuracy
        unsigned long over;

        time_elapsed = finish_time - start_time; //same equation
        h = int(time_elapsed/ 3600000); //calculate hours and type cast to integer losing accuracy but shown in minutes, seconds
        over = time_elapsed % 3600000; //this takes the remainder of time to calculate minutes
        m = int(over/ 60000); //calculate minutes
        over = over % 60000; //take remainder again
        s = int(over/ 1000); //calculate seconds
        over = over % 1000; //remainder
        ms = over; //no further accuracy calculations, set to remaining time

        // now we can display our results to the LCD Shield!

        lcd.setCursor(0, 1);
        lcd.print(h, 0); //disp hours
        lcd.print("h "); //use h for spacing instead of hours

        lcd.print(m, 0); //disp minutes
        lcd.print("m ");

        lcd.print(s, 0); //disp seconds
        lcd.print("s ");

        if (h < 10) //if hours are less than double digits we will have enough room
        {
          lcd.print(ms, 0); //disp milliseconds
          lcd.print("ms -");

        }
    }

}
We have now completed coding our arduino!
Full Code
/*
 * Arduino Stopwatch
 * Mark Ashinhust
 */

 #include <SPI.h>
 #include <LiquidCrystal.h>

 //pins that are used on the shield
 LiquidCrystal lcd(8,13,9,4,5,6,7);

 //variables used for counting mechanism
 unsigned long start_time, finish_time, time_elapsed;
 boolean r = false;

 //vars for button debounce time
 long timeSinceLastPress = 0; //time since last button press
 long debounceDelay = 50; //the debounce time, set as low as possible

 void setup(){

  lcd.begin(16, 2); //initialize the lcd 16 characters and 2 line
  lcd.print("Simple");
  lcd.setCursor(3,1); //set cursor to the fourth char on line 2
  lcd.print("Stopwatch");
  delay(2000); //wait two seconds
  lcd.clear(); //clear the lcd display
  lcd.print("Press SELECT for");
  lcd.setCursor(2,1); //set cursor to the third char on line 2
  lcd.print("Start & Stop");

 }

 void loop(){

  CheckStartStop();
  DispResult();

 }

 void CheckStartStop(){

  int x = analogRead(0); //assign 'x' to the AnalogueInput (Shield button)
  if (x < 800 && x < 600) //if the button SELECT was pressed
  {
    if ((millis() - timeSinceLastPress) > debounceDelay)
    {
      if (r ==false){
        lcd.clear();
        lcd.setCursor(2, 0);
        lcd.print("Elapsed Time");
        start_time = millis(); //save start time, difference to be used for elapsed
      }
      else if(r=true)
      {
        lcd.setCursor(2, 0);
        lcd.print(" Final Time ");

      }
      r = !r;
    }
    timeSinceLastPress = millis();
  }
 }

 void DispResult()
 {

  if (r==true)
  {
    finish_time = millis(); //save the stop time, calculate difference for elapsed time
    //declare calculation variables
    float h, m, s, ms;
    unsigned long over;

    time_elapsed = finish_time - start_time;
    h = int(time_elapsed/ 3600000); //calculate hours
    over = time_elapsed % 3600000; //remainder of hours calculation
    m = int(over/60000); //calculate minutes with remainder of hours
    over = over % 60000; //remainder of minutes
    s = int(over / 1000); //calculate seconds
    ms = over % 1000; //remainder of seconds

    //display final results
    lcd.setCursor(0, 1);
    lcd.print(h, 0); //disp hours
    lcd.print("h "); //use h for spacing instead of hours

    lcd.print(m, 0); //disp minutes
    lcd.print("m ");

    lcd.print(s, 0); //disp seconds
    lcd.print("s ");

    if (h < 10) //if hours are less than double digits we will have enough room
    {
      lcd.print(ms, 0); //disp milliseconds
      lcd.print("ms -");
    }
  }

 }
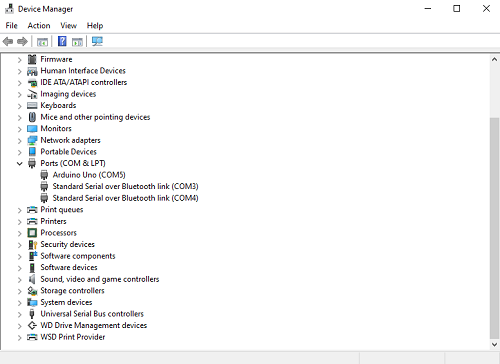
Device Not Found Troubleshooting
Can’t find your arduino device in your tools? No worries, let’s fix this.
- Make sure you have a working USB Port in your computer
- To do this you can plug in something else that works and see if it is recognized by your computer
- Check and make sure you are using a Charging Cable instead of a Data Transfer cable with your Arduino. The one I listed at the beginning should work but not all will work as some do not output and power to your device.
- Check your Windows/Mac device manager and make sure that your devices are up-to-date and search for new devices
Hopefully this helps out and everything gets connected!